Android で CoverFlow
仕事の調査で見つけた Neil Davies 氏による CoverFlow コントロールが面白かったので使い方を学ぶべく簡単なサンプル アプリを作ってみる。
CoverFlow コントロールは Neil Davies 氏のブログに掲載されているサンプルをベースに実装する。
まず com.example.coverflow.CoverFlow を元に CoverFlowGallery というクラスを作成する。ソースは Apache ライセンス 2.0 で公開されているのでその記述は残す。元がよくできているので変更点はインデント付けやコメント追加、パッケージ・クラス名の書きかえ程度である。
次にこのクラスで表示するための Adapter だが Neil Davies 氏のサンプルでは Activity 内クラスとなっているので取り回しをよくするために個別クラスとする。また反射エフェクトの有無やサイズなどを外部から指定できるようにしておく。けっこう大きく変更したのでコードをまとめて掲載する。
package jp.gr.java_conf.akabeko.testimagegallery.widget;

import android.content.Context;
import android.graphics.Bitmap;
import android.graphics.BitmapFactory;
import android.graphics.Canvas;
import android.graphics.LinearGradient;
import android.graphics.Matrix;
import android.graphics.Paint;
import android.graphics.PorterDuffXfermode;
import android.graphics.Bitmap.Config;
import android.graphics.PorterDuff.Mode;
import android.graphics.Shader.TileMode;
import android.graphics.drawable.BitmapDrawable;
import android.view.View;
import android.view.ViewGroup;
import android.widget.BaseAdapter;
import android.widget.Gallery;
import android.widget.ImageView;
import android.widget.ImageView.ScaleType;

/**
 * CoverFlow と画像を関連付けるためのアダプターです。
 */
public class CoverFlowImageAdapter extends BaseAdapter {
    /**
     * 元画像と反射エフェクト間の距離。
     */
    private static int REFLECTION_GAP = 4;

    /**
     * ビットマップの読み込み設定。
     */
    private BitmapFactory.Options mOptions = new BitmapFactory.Options();

    /**
     * コンテキスト。
     */
    private Context mContext;

    /**
     * サムネイル画像を動的に生成することを示す値。
     */
    private boolean mIsMakeThumbnail;

    /**
     * 反射エフェクトを使用することを示す値。
     */
    private boolean mIsUserEffect;

    /**
     * レイアウト情報。
     */
    private Gallery.LayoutParams mLayoutParams;

    /**
     *  画像のリソース ID コレクション。
     */
    private int[] mResourceIds;

    /**
     * アイテムの幅と高さを指定して、インスタンスを初期化します。
     *
     * @param context         コンテキスト。
     * @param ids             画像のリソース ID コレクション。
     * @param width           アイテムの幅。
     * @param height          アイテムの高さ。
     * @param isMakeThumbnail サムネイル画像を動的に生成する場合は true。それ以外は false。
     * @param isUserEffect    反射エフェクトを使用する場合は true。それ以外は false。
     */
    public CoverFlowImageAdapter( Context context, int[] ids, int width, int height, boolean isMakeThumbnail, boolean isUserEffect ) {
        this.mContext         = context;
        this.mResourceIds     = ids;
        this.mIsMakeThumbnail = isMakeThumbnail;
        this.mIsUserEffect    = isUserEffect;
        this.mLayoutParams    = new Gallery.LayoutParams( width, height );
    }

    /**
     * リソース ID から画像を取得します。
     *
     * @param id リソース ID。
     *
     * @return 成功時は Bitmap インスタンス。それ以外は null 参照。
     */
    private Bitmap decodeBitmap( int id ) {
        if( this.mIsMakeThumbnail ) {
            this.mOptions.inJustDecodeBounds = true;
            BitmapFactory.decodeResource( this.mContext.getResources(), id, this.mOptions );

            int width  = ( this.mOptions.outWidth  / this.mLayoutParams.width  ) + 1;
            int height = ( this.mOptions.outHeight / this.mLayoutParams.height ) + 1;
            int scale  = Math.max( width, height );

            this.mOptions.inJustDecodeBounds = false;
            this.mOptions.inSampleSize = scale;

            return BitmapFactory.decodeResource( this.mContext.getResources(), id, this.mOptions );

        } else {
            return BitmapFactory.decodeResource( this.mContext.getResources(), id );
        }
    }

    /**
     * アイテムの総数を取得します。
     *
     * @return アイテム数。
     */
    public int getCount() {
        return this.mResourceIds.length;
    }

    /**
     * 指定されたインデックスの指すアイテムを取得します。
     *
     * @param position インデックス。
     *
     * @return アイテム。
     */
    public Object getItem( int position ) {
        return position;
    }

    /**
     * 指定されたインデックスの指すアイテムの識別子を取得します。
     *
     * @param position インデックス。
     *
     * @return 識別子。
     */
    public long getItemId( int position ) {
        return position;
    }

    /**
     * ビューの内容を取得します。
     *
     * @param position    ビュー内における、アイテムの表示位置を示すインデックス。
     * @param convertView 表示領域となるビュー。
     * @param parent      親となるビュー。
     */
    public View getView( int position, View convertView, ViewGroup parent ) {
        ImageView view = new ImageView( this.mContext );

        Bitmap bmp = decodeBitmap( this.mResourceIds[ position ] );
        view.setLayoutParams( this.mLayoutParams );
        view.setScaleType( ScaleType.CENTER_INSIDE );
        view.setImageBitmap( this.mIsUserEffect ? this.makeReflectedImage( bmp, REFLECTION_GAP ) : bmp );

        BitmapDrawable drawable = ( BitmapDrawable )view.getDrawable();
        drawable.setAntiAlias( true );

        return view;
    }

    /**
     * 画像の下部に反射エフェクトを付けた Bitmap を生成します。
     *
     * @param src 元となる画像。
     * @param gap 元画像と反射エフェクト間の距離。
     *
     * @return 成功時は Bitmap インスタンス。それ以外は null 参照。
     */
    private Bitmap makeReflectedImage( Bitmap src, int gap ) {
        Matrix matrix = new Matrix();
        matrix.preScale( 1, -1 );

        int    width      = src.getWidth();
        int    height     = src.getHeight();
        int    destHeight = height + height / 2;
        Bitmap effect     = Bitmap.createBitmap( src, 0, height / 2, width, height / 2, matrix, false );
        //Bitmap dest       = Bitmap.createBitmap( width, destHeight, Config.ARGB_4444 );
        Bitmap dest       = Bitmap.createBitmap( width, destHeight, Config.ARGB_8888 );
        Canvas canvas     = new Canvas( dest );

        canvas.drawBitmap( src, 0, 0, null );
        canvas.drawRect( 0, height, width, height + gap, new Paint() );
        canvas.drawBitmap( effect, 0, height + gap, null );

        Paint paint  = new Paint();
        paint.setShader( new LinearGradient( 0, height, 0, destHeight + gap, 0x70ffffff, 0x00ffffff, TileMode.CLAMP ) );
        paint.setXfermode( new PorterDuffXfermode( Mode.DST_IN ) );
        canvas.drawRect( 0, height, width, destHeight + gap, paint );

        return dest;
    }
}
このサンプルではプロジェクト内のリソース画像を使用している。動的にサムネイル生成するよう実装したところ、処理がまずいのか動きがとても重かった。その実装は CoverFlowImageAdapter.decodeBitmap() の中に残しておくが今回はサムネイル画像もリソースとして用意してそれを使用することにした。
ちなみに CoverFlowGallery は単なる Gallery 派生クラスなので SpinnerAdapter 系ならなんでも指定可能。リソース以外の画像を表示したいなら、そのような Adapter を実装すればよい。CoverFlowImageAdapter.makeReflectedImage() の引数は Bitmap にしてあるので、その場合でも流用できるはず。
これらを実装したら実際に使用してみる。CoverFlowGallery を使用する Activity のレイアウト XML に以下の定義を追加する。
<!-- ギャラリー -->
<jp.gr.java_conf.akabeko.testimagegallery.widget.CoverFlowGallery
    android:id="@+id/content_list"
    android:layout_width="fill_parent"
    android:layout_height="wrap_content" />
XML に関連づけられたクラスでは、以下のように初期化する。
this.mCoverFlowGallery = ( CoverFlowGallery )this.findViewById( R.id.content_list );
this.mCoverFlowGallery.setAdapter( new CoverFlowImageAdapter( this.getApplicationContext(), this.mPictureManager.getThumbnailIds(), 200, 200, false, true ) );
this.mCoverFlowGallery.setSpacing( -25 );
this.mCoverFlowGallery.setSelection( this.mPictureManager.getCurrentIndex(), true );
this.mCoverFlowGallery.setAnimationDuration( 1000 );
this.mCoverFlowGallery.setOnItemClickListener( this );
this.mCoverFlowGallery.setOnItemSelectedListener( this );
CoverFlowGallery で表示するための Adapter として前述の CoverFlowImageAdapter を指定。生成時の引数は順にアプリケーション コンテキスト、サムネイル画像のリソース ID 配列、アイテムの幅、高さ、サムネイル生成無効、反射エフェクト有効、となる。幅と高さを変更した場合は CoverFlow の表示角度などにも影響するので注意する。
ギャラリーが完成したので表示してみる。

フリックすると中央の画像が切り替わってゆく。これだけでは寂しいので画像のタイトルとインデックス情報を上下へ表示するようにしてある。画像には Creative Common な写真を使用するつもりだったのだが著作情報の表示を設計するのが面倒だったので、かつて私が旅行などで撮影した写真を採用した。
サンプルとしてはここまでで十分かもしれないが、せっかくなのでもう少し画像ビューアーっぽくする。ギャラリー上で選択されたものを画面遷移して表示してみる。Gallery.setOnItemClickListener() でアイテムのクリックをハンドリングできるので、ここで Activity を移動する。
/**
 * リスト上のアイテムがクリックされた時に発生します。
 *
 * @param parent   リストに関連付けられている Adapter。
 * @param view     操作対象の View。
 * @param position 操作対象となったアイテムのインデックス。
 * @param id       操作対象となったアイテムの識別子。
 */
public void onItemClick( AdapterView< ? > parent, View view, int position, long id ) {
    Intent intent = new Intent();
    intent.setClass( this, PictureActivity.class );
    this.startActivityForResult( intent, PICTURE_ACTIVITY );
}
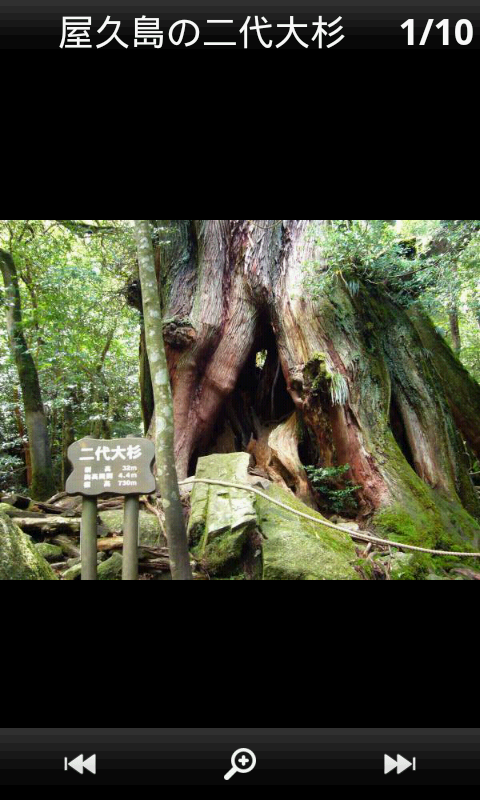
移動した Activity は以下のようになる。

Android 端末の戻るボタンを押すか画面上部のタイトルバー部分をタップするとギャラリーに戻る。画面下部の矢印ボタンをタップ、または画面中央の写真部分フリックで写真の前後を切り替える。虫メガネ型アイコンをタップすることで写真の表示を ScaleType.CENTER と ScaleType.FIT_CENTER でトグル式に切り替わる。
今回は実装しなかったけれど ViewFlipper で写真の切り替えにエフェクトをかけたりスライドショーでもつければ画像ビューアーとしてそこそこの出来ではなかろうか。最後に今回のサンプル プロジェクトを公開しておく
Android 2.1 update 1 (API Level 7) でビルドし Android エミュレータと初代 Xperia (SO-01B) にて動作確認をおこなった。
Comments from WordPress
- Yamaguchi 2011-09-20T00:14:23Z
大変参考になりました。